
A join code lets someone who already has a NerdyTags profile give your organization access to manage it. Your client stays the owner the whole time. They see exactly what you're asking for before they agree, and they can change or remove your access whenever they like.
It works in three steps:
You create a code and choose what your team can change.
You share the code or link with your client.
Your client reviews the permissions and confirms in their NerdyTags dashboard.
To create join codes, you need the Create join codes so existing NerdyTags users can link their profiles permission. Owners and Admins have it. See Roles and permissions in NerdyTags Business.
Create a join code
In NerdyTags Business, go to Join codes and click New join code. You can also click Link existing on Profiles or Link an existing profile on Overview.
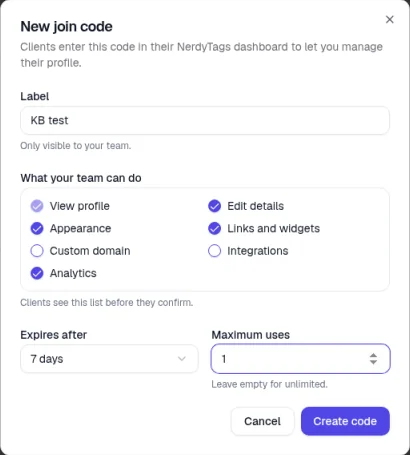
Enter a Label so your team knows who the code is for, for example the client's name. Only your team sees the label.
Under What your team can do, tick the permissions you need. Your client sees this list before they confirm.
Choose when the code Expires after: 1, 7, 30, 90 or 365 days, or Never. The default is 30 days.
Set Maximum uses if you want to limit how many times the code can be used. Leave it empty for unlimited.
Click Create code.
The new code is copied for you straight away. Codes look like NT-XXXX-XXXX.
Permissions
View profile is always included. New codes also start with Edit details, Appearance, Links and widgets and Analytics ticked. Custom domain and Integrations start unticked, so tick them only if you need them.
Your client sees each permission described in plain words:
Permission | What your client sees |
|---|---|
View profile | View your profile and its content |
Edit details | Edit profile details, tabs and settings |
Appearance | Change theme, colors, avatar and custom CSS |
Links and widgets | Manage links, social icons and widgets |
Custom domain | Manage your custom domain |
Integrations | Manage subscribers, integrations and Shopify |
Analytics | View your analytics |
Share the code
Each code on the Join codes page has three ways to share it:
Copy code copies the code itself. Your client enters it in their NerdyTags dashboard.
Copy link copies a link that opens the join page with the code already filled in.
Show QR code (the QR icon) shows a QR code that does the same as the link. Click Download PNG to save it, for example to print or add to a slide.
Treat a code like a key. Anyone who has it can use it to offer you access to their profile, so share it only with the client it's meant for, and set a maximum number of uses when you can.
What your client sees
Your client goes to Settings > Organizations in their NerdyTags dashboard and enters the code, or opens your link. They then see an access request from your organization, where they:
Choose which of their profiles you should manage. They can pick more than one. Each profile can be linked to only one organization at a time, so a profile that's already linked shows Already linked to an organization and can't be picked. Your client needs to remove the other organization first.
Untick any permission they don't want to give. Viewing is always included.
Confirm with Give access.
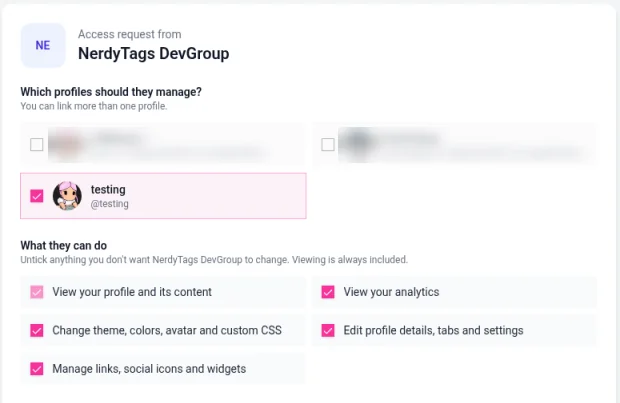
Once they confirm, the profile appears on your Profiles page as Managed, with the owner listed. Your client keeps ownership and can edit or remove your access at any time. Send them Letting an agency or company manage your profile if they'd like a walkthrough.
Track and revoke codes
Each code shows its label, how many times it's been used, when it expires and the permissions it asks for. Use Active and All at the top of the list to switch between codes that still work and every code you've made.
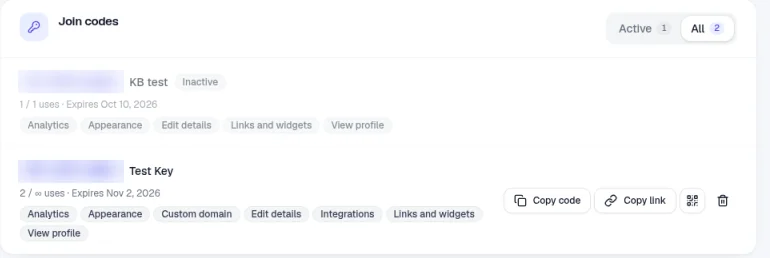
Revoke a code with the trash icon (Revoke code) when you no longer want it to be used.
Used-up codes: when a code reaches its maximum uses, it becomes Inactive. It stays in the All list for your records but can't be copied or shared.
Expired codes: each code shows its expiry date. If a client needs a code after it expires, create a new one.
To end access to a client profile that's already linked, use Stop managing on the Profiles page. See Creating and managing company profiles.