
The Profiles page in NerdyTags Business lists every profile your organization looks after. There are two kinds:
Organization-owned profiles are created in NerdyTags Business and belong to your organization. Use them for team members, locations or brands. They show as Owned in the list.
Managed for clients profiles belong to someone else's NerdyTags account. The owner linked the profile to your organization with a join code and stays the owner. These show as Managed, with the owner listed underneath.
Both kinds count toward your profile limit of 10 profiles per seat.
Creating organization-owned profiles needs the Create profiles owned by the organization permission, which Owners, Admins and Editors have. A profile you create belongs to the organization, and you get direct access to it. Owners, Admins and Editors can also duplicate profiles. Deleting, transferring or unlinking profiles needs Delete, transfer or unlink profiles, which Owners and Admins have. What someone can change inside a profile depends on their profile permissions and which profiles they can access. See Roles and permissions in NerdyTags Business.
Create a profile
Go to Profiles and click Create profile. You can also click Create profile on Overview.
Enter a Display name, for example the person's name and your company name.
Enter a Username. This becomes the profile's address after nerdyt.ag/, and it must be 3 to 30 letters, numbers or underscores.
Click Create profile.
The new profile opens in the editor, marked Organization-owned, and appears on Profiles as Owned. The Create a profile window shows how many of your profiles you've used. If you've used them all, see Business billing and seats.
Pick the username carefully. Changing it later changes the profile's address, so links, printed QR codes and NFC tags that point to the old address stop working.
Edit a profile
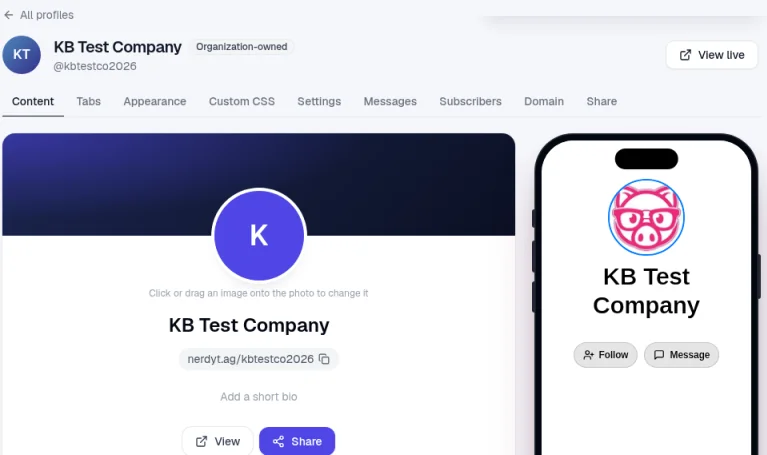
Click Edit in a profile's actions to open it in the editor. A live phone preview on the right shows what visitors will see, and View live opens the public profile. Duplicate, next to View live, makes a copy of the profile (see Duplicate a profile below). Next to the profile's name, the editor shows Organization-owned, or Managed for and the owner for a client profile. While a profile is open, its sections are also listed under Profiles in the sidebar.
Section | What's in it |
|---|---|
Content | The profile photo, display name and bio, plus Links, Socials, Widgets and Location. Click or drag an image onto the photo to change it. Finish your profile shows a checklist of steps like Upload a profile photo and Write a short bio, and Last 7 days shows the profile's Views, Clicks and Click rate. Full analytics opens Analytics filtered to this profile. |
Tabs | The profile's tabs. See Adding tabs to your profile. |
Appearance | Theme, colors and other design options, plus Share your theme and Import a theme to copy a theme between profiles. See How to customize your profile theme. |
Custom CSS | Your own CSS for the profile. |
Settings | Username, Discover, Profile tags, Followers & messages, Contact card (vCard) and Tracking pixels. See Profile and privacy settings. |
Messages | Messages sent to the profile. Only organization-owned profiles have this section. Client profiles don't, because their messages stay private to the owner. |
Subscribers | The profile's Signup form, its Integrations and the subscribers and form submissions it has collected. See Collect subscribers on a profile below. |
Domain | A custom domain for this profile, set up in four steps: Connect, Add DNS records, Secure and Live. See How to add a custom domain to your profile. |
Share | Your profile link with Copy link and Open, plus a QR code to download and an NFC tag option. Scans are counted in Analytics. See Sharing your profile with a QR code and Using NFC tags with NerdyTags. |
On client profiles, your team can only make the changes the owner allowed when they linked the profile.
If your organization has turned on the AI assistant, people who can edit a profile see a Write with AI button, for example on the bio and on the About tab. See Using the AI assistant in NerdyTags Business.

Collect subscribers on a profile
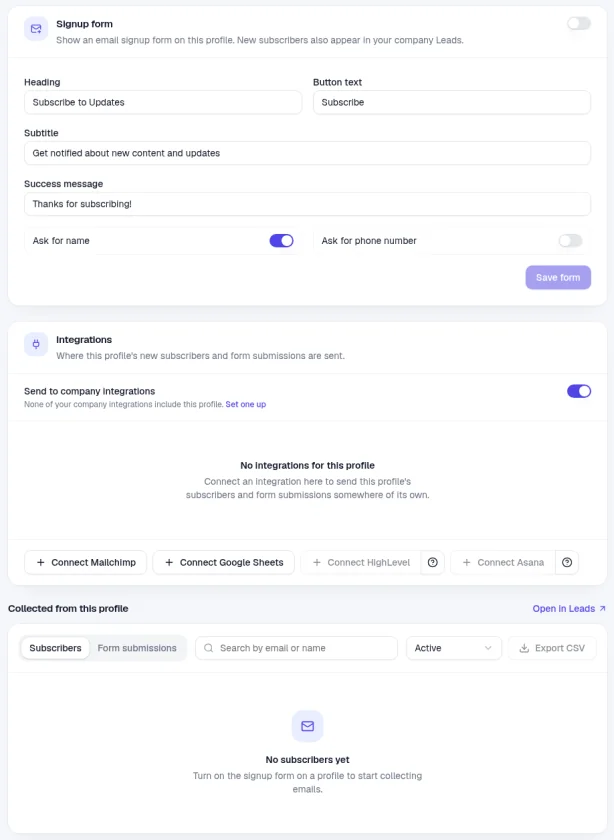
The Subscribers section has three parts:
Signup form: "Show an email signup form on this profile. New subscribers also appear in your company Leads." Turn the form on with the switch at the top of the panel. Set the Heading, Button text, Subtitle and Success message, for example "Subscribe to Updates", "Subscribe", "Get notified about new content and updates" and "Thanks for subscribing!". Turn on Ask for name or Ask for phone number if you want them, then click Save form.
Integrations: where this profile's new subscribers and form submissions are sent. Turn off Send to company integrations to opt the profile out, or connect the profile's own integrations with the Connect buttons. If none of your company integrations include the profile, it says so, with a Set one up link. See Company tracking and integrations.
Collected from this profile: the profile's Subscribers and Form submissions, with Search by email or name, a status filter, Export CSV and Open in Leads. Until someone signs up, it says No subscribers yet.
Add a client's existing profile
To manage a profile that already belongs to someone, click Link existing. It takes you to Join codes, where you create a code for the owner to accept. See Managing client profiles with join codes.
Find a profile
Search by name or username to find a profile quickly.
Choose All profiles, Organization-owned or Managed for clients to filter the list.
Use the sort menu to change the order. Newest first is the default.
The table shows each profile's Type and its Views and Clicks over the last 30 days. For more detail, see Analytics, leads and inbox in NerdyTags Business.
Profile actions
Click the ... button at the end of a profile's row to open its actions. The options depend on the kind of profile:
Organization-owned profiles | Client profiles |
|---|---|
Edit | Edit |
Open public page | Open public page |
Duplicate | Duplicate |
Transfer to a person | Stop managing |
Delete profile |
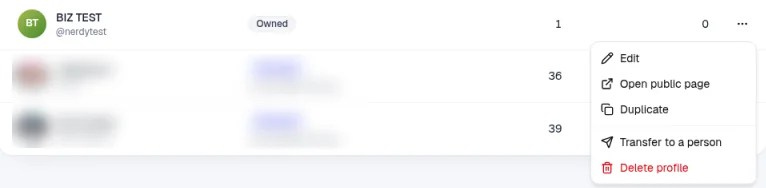
Edit opens the profile in the editor. If you can only view a profile, you'll see View instead, and the editor opens marked View only.
Open public page opens the live profile.
Duplicate creates a new company-owned copy of the profile.
Stop managing ends your organization's access to a client profile. The profile stays with its owner.
Duplicate a profile
Duplicating is a quick way to set up a new profile that looks like one you already have, for example a new team member's profile based on a colleague's. Owners, Admins and Editors can duplicate profiles, including client profiles you manage. The copy is always a new company-owned profile.
Click ... on the profile's row and choose Duplicate, or click Duplicate at the top of the profile editor.
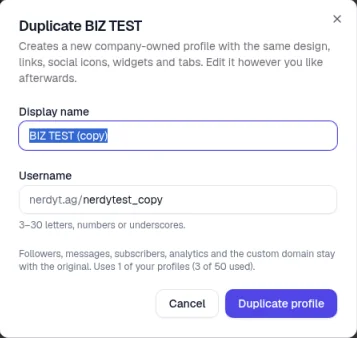
Check the Display name. It starts as the original's name with "(copy)" added, for example "BIZ TEST (copy)".
Check the Username. It starts as the original's username with "_copy" added. It must be 3 to 30 letters, numbers or underscores.
Click Duplicate profile.
What's copied and what isn't:
Copied: the design, links, social icons, widgets and tabs. You can edit the copy however you like afterwards.
Stays with the original: followers, messages, subscribers, analytics and the custom domain.
The copy appears on Profiles as Owned. It uses 1 of your profiles, and the window shows how many you've used, for example "3 of 50 used". It doesn't use a seat. Duplicating is recorded in the audit log, for example "duplicated a profile as @nerdytest_copy".
Transfer a profile to a person
Transferring hands an organization-owned profile over to someone's NerdyTags account, and they become its owner. This is useful when a team member leaves and wants to keep their profile.
Click ... on the profile's row and choose Transfer to a person.
Enter the Recipient's NerdyTags email. They need an existing NerdyTags account.
Choose whether to keep Keep managing it for them ticked. It's ticked to start with. Your organization keeps edit access until they revoke it.
Click Transfer profile. The button stays greyed out until you enter an email.
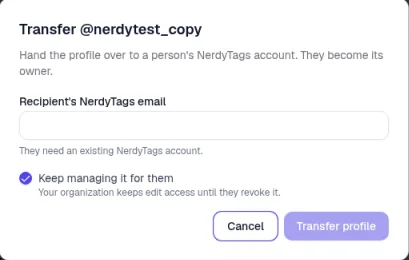
A message confirms the transfer, for example "@nerdytest_copy transferred to" and the recipient's email. The profile then appears in their NerdyTags dashboard as their own, marked Owner in their profile switcher.
If you kept managing it, the profile stays on your Profiles page as Managed, with the new owner's email underneath, and still counts toward your profiles. Its actions menu then shows Edit, Open public page, Duplicate and Stop managing, like any client profile. The transfer is recorded in the audit log as "transferred profile".
Delete a profile
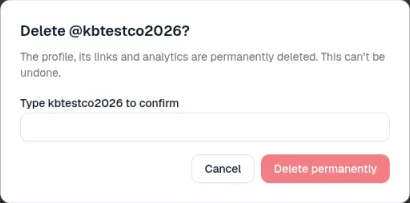
Deleting an organization-owned profile permanently removes it, along with its links and analytics. This can't be undone.
Click ... on the profile's row and choose Delete profile.
Type the profile's username to confirm.
Click Delete permanently.
Creating and deleting profiles is recorded under Profiles in the audit log.
Before you can delete your organization, you need to delete or transfer all of its own profiles. See Getting started with NerdyTags Business.