
Set things up once for the whole company instead of profile by profile. Tracking IDs apply to every company-owned profile, and company integrations collect new subscribers and form submissions from your company profiles in one place.
Tracking
In NerdyTags Business, go to Settings > Tracking.
Enter your Google Analytics ID. This is a GA4 measurement ID like G-XXXXXXXXXX.
Enter your Meta Pixel ID. This is the numeric ID from Meta Events Manager.
Click Save tracking.
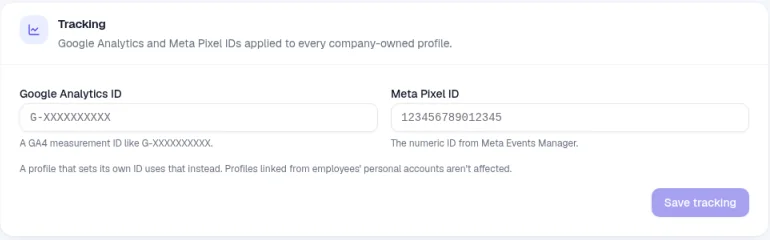
How the IDs are applied:
They're added to every company-owned profile.
A profile that sets its own ID uses that instead. Use this when one profile needs to report to a different account. A profile's own IDs are under Tracking pixels in the Settings section of the profile editor.
Profiles linked from employees' personal accounts aren't affected.
Integrations
Go to Settings > Integrations. Connect an integration once, and subscribers and form submissions from your company profiles are sent to it automatically. You can limit each integration to certain profiles, and profiles can opt out or add their own.
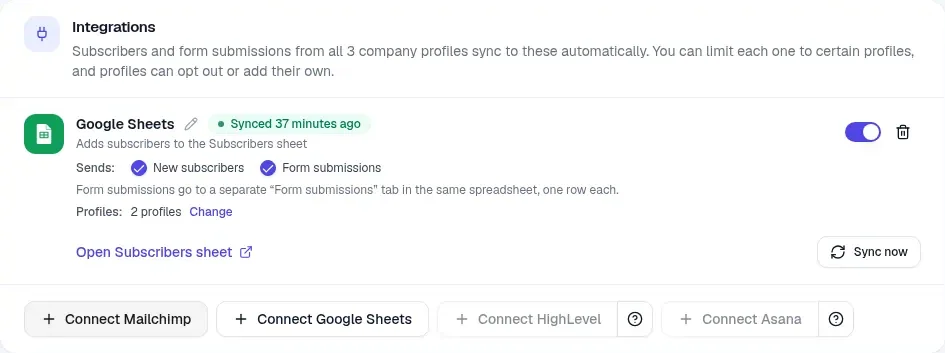
The Connect buttons along the bottom are for Mailchimp, Google Sheets, HighLevel and Asana. HighLevel and Asana are coming soon. Their buttons are greyed out while our apps wait for approval. See Connecting HighLevel to NerdyTags Business and Connecting Asana to NerdyTags Business.
To send leads to Zapier, Make, n8n or another app, use Webhooks & Zapier further down the same tab. Webhooks need the Edit organization details permission. See Sending leads to Zapier, Make and other apps with webhooks.
Connect Mailchimp
On Settings > Integrations, click Connect Mailchimp.
Mailchimp's sign-in page opens. Sign in to your Mailchimp account and authorize NerdyTags.
Return to NerdyTags Business and finish any setup steps shown on the Integrations tab.
Connect Google Sheets
On Settings > Integrations, click Connect Google Sheets.
Follow the steps to sign in with your Google account and allow access.
Return to NerdyTags Business and finish any setup steps shown on the Integrations tab.
New subscribers are added to the sheet named on the connection, for example "Adds subscribers to the Subscribers sheet". Form submissions go to a separate Form submissions tab in the same spreadsheet, one row each. The link under the connection, such as Open Subscribers sheet, opens the spreadsheet.
Manage a connection
Each connection on the Integrations tab shows its status, such as Connected or when it last synced, and what it sends. From there you can:
Rename it. Click the pencil next to its name, enter a new name and click Save. Pick a name that tells it apart, like the account, list or team it sends to. This helps when you've connected the same service more than once.
Choose what it sends. Google Sheets has a Sends setting with New subscribers and Form submissions. Tick the ones you want.
Limit it to certain profiles. Next to Profiles, click Change. Choose All profiles, which includes profiles added later, or Specific profiles and tick the ones you want. Click Save. This is handy for giving different profiles their own list, sheet, project or account.
Send existing subscribers. Click Sync now. If you add profiles to a connection, people who already subscribed on those profiles are sent the next time you click Sync now.
Turn it on or off with the switch on the right.
Remove it with the bin icon.
Opt a profile out, or give it its own integrations
Each profile's integration settings are in the profile editor.
On Profiles, open the profile with Edit.
Go to the Subscribers tab and find the Integrations panel. It shows where the profile's new subscribers and form submissions are sent.
To stop this profile's subscribers and form submissions going to the company integrations, turn off Send to company integrations. The text under the switch names the company integrations it sends to.
To send this profile's leads somewhere of its own, use the Connect buttons in the same panel.
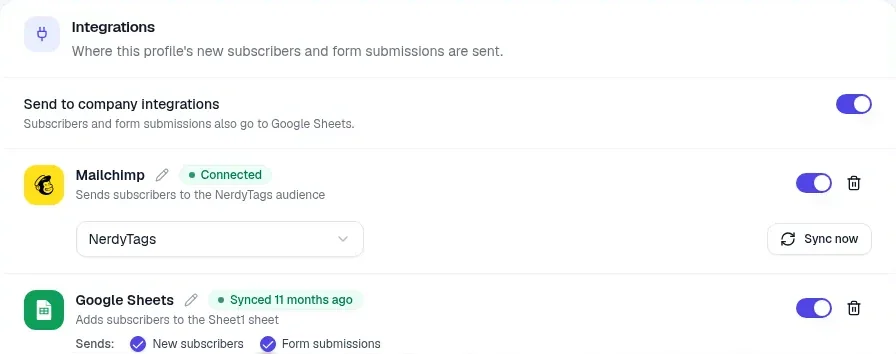
A profile's own integrations work whether Send to company integrations is on or off, so a profile can use both. Webhooks are set up for the whole organization on Settings > Integrations, not on individual profiles.
Under the panel, Collected from this profile lists the profile's subscribers and form submissions, with search, a status filter and Export CSV. Click Open in Leads to see them on the Leads page.
To change these settings, you need the Manage email subscribers, integrations and Shopify permission for the profile. Owners and Admins have it. See Roles and permissions in NerdyTags Business. On client profiles, the Send to company integrations switch only appears if the owner gave your organization that permission. Your client sees it as Manage subscribers, integrations and Shopify.
All your subscribers and form submissions, from every profile, are also listed on the Leads page. See Analytics, leads and inbox in NerdyTags Business.
For integrations on a personal NerdyTags account, see Connecting Mailchimp, Google Sheets, Shopify and other integrations.