
Webhooks send your new subscribers and form submissions to Zapier, Make, n8n or any other app that accepts webhooks. Each new lead is sent within seconds, so you can pass it on to a CRM, a spreadsheet, Slack or anything else your app connects to.
Webhooks are part of NerdyTags Business. You set them up for the whole organization on Settings > Integrations, in the Webhooks & Zapier section. They aren't set up on individual profiles or in a personal NerdyTags dashboard.
Before you start
You need the Edit organization details permission. Owners and Admins have it. See Roles and permissions in NerdyTags Business.
Your organization needs to be active, with a paid subscription or complimentary seats. When a complimentary period ends, the organization becomes read-only and webhooks stop sending.
An organization can have up to 20 webhooks.
Add a webhook
Go to Settings > Integrations and scroll to Webhooks & Zapier.
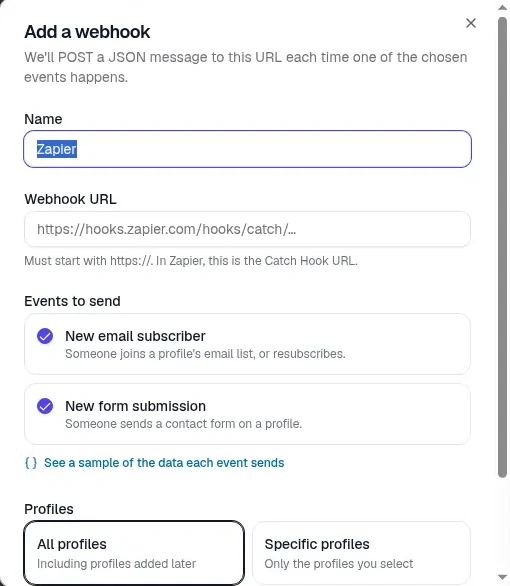
Click Add webhook.
Give it a Name. It starts as "Zapier", so change it if you're using another app.
Paste the Webhook URL from your app. It must start with https://. In Zapier, this is the Catch Hook URL.
Under Events to send, tick what to send. Both are ticked to start with:
New email subscriber: someone joins a profile's email list, or resubscribes.
New form submission: someone sends a contact form on a profile.
Under Profiles, choose All profiles, which includes profiles added later, or Specific profiles and select the ones you want.
Click Add webhook.
Your webhook's signing secret is shown when the webhook is created. You can view it again at any time. See Verifying webhook signatures below.
Profiles you manage for clients are included only when the owner allowed integrations. See Managing client profiles with join codes.
Connect Zapier
The How to connect Zapier steps are also on the Webhooks & Zapier section. It takes about two minutes.
In Zapier, create a Zap and choose Webhooks by Zapier as the trigger, with the Catch Hook event.
Copy the webhook URL Zapier gives you.
In NerdyTags Business, click Add webhook, paste the URL and choose the events and profiles to send.
Click Send test in the webhook's actions menu, then Test trigger in Zapier. Zapier shows the sample subscriber or form submission.
Add the actions you want, such as a CRM, a spreadsheet or Slack, and turn the Zap on.
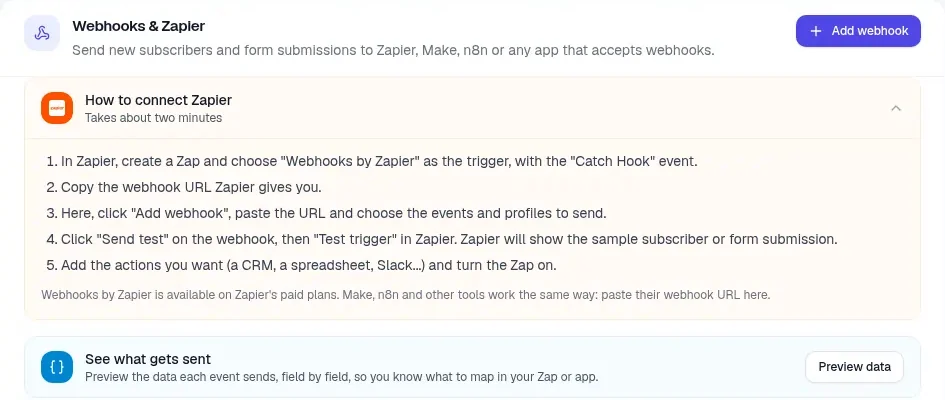
Webhooks by Zapier is available on Zapier's paid plans.
Make, n8n and other apps
Make, n8n and other tools work the same way. Create a webhook trigger in your app, copy its webhook URL, and paste it into Webhook URL when you add the webhook in NerdyTags Business. Then use Send test to send a sample so you can map the fields.
See what gets sent
Click Preview data under See what gets sent to see the data for each event, field by field, so you know what to map in your Zap or app. Choose New subscriber or Form submission at the top. Switch between Fields and JSON, and click Copy JSON to copy the sample. The sample uses your organization's details. Real events contain the actual subscriber or submission.
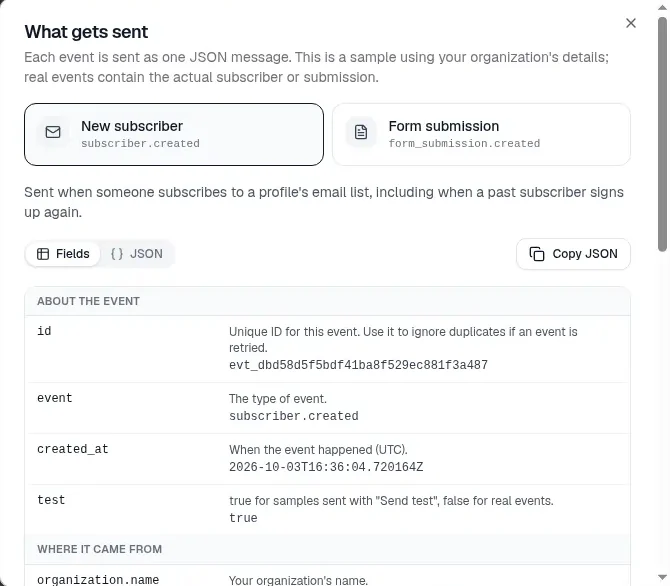
You'll also find a See a sample of the data each event sends link in the Add a webhook window.
Fields in every event
Field | What it is |
|---|---|
| Unique ID for this event. Use it to ignore duplicates if an event is retried. |
| The type of event: |
| When the event happened (UTC). |
|
|
| Your organization's name. |
| Your organization's short name used in links. |
| Username of the profile the event happened on. |
| Display name of that profile. |
| Public link to that profile. |
New subscriber (subscriber.created)
Sent when someone subscribes to a profile's email list, including when a past subscriber signs up again.
Field | What it is |
|---|---|
| The subscriber's email address. |
| The subscriber's name, if they gave one. |
| The subscriber's phone number, if they gave one. |
| Where they signed up, such as the subscribe widget. |
|
|
| When they subscribed (UTC). |
Form submission (form_submission.created)
Sent when someone submits a contact or custom form on a profile. Every answer is included, labeled with the form's field names.
Field | What it is |
|---|---|
| The name of the form that was submitted. |
| The submitter's email, when the form asks for one. |
| Every answer, keyed by the field's label. This is the easiest to map in Zapier. |
| The same answers as a list, with each field's label, type and value. |
| When the form was submitted (UTC). |
Here's an example form submission:
{
  "id": "evt_0ff7debf5a78456eaa4b482c5ac5e030",
  "event": "form_submission.created",
  "created_at": "2026-10-03T16:36:47.067447Z",
  "test": true,
  "organization": { "id": 1, "name": "Acme Realty", "slug": "acme-realty" },
  "profile": { "id": 1, "username": "acmerealty", "title": "Acme Realty", "url": "https://nerdyt.ag/acmerealty" },
  "data": {
    "submission_id": 0,
    "form_name": "Contact us",
    "link_id": 0,
    "submitter_email": "[email protected]",
    "fields": { "Name": "Jane Doe", "Email": "[email protected]", "Message": "Hi! I have a question." },
    "field_list": [
      { "label": "Name", "type": "text", "value": "Jane Doe" },
      { "label": "Email", "type": "email", "value": "[email protected]" },
      { "label": "Message", "type": "textarea", "value": "Hi! I have a question." }
    ],
    "submitted_at": "2026-10-03T16:36:47.067413Z"
  }
}
Manage a webhook
Each webhook in the Webhooks & Zapier section has an actions menu with these options:
Edit: change the name, URL, events and profiles.
Pause or Resume: stop sending for a while, then start again.
Delete: remove the webhook.
Send test: send the sample from Preview data to your URL.
Signing secret: view the webhook's secret, or generate a new one.
Recent deliveries: the delivery log, with the status and response for each delivery and a button to retry it. It shows the last 50 deliveries from the past 30 days.
How webhooks are delivered
Each event is sent as an HTTPS POST with a JSON body, within seconds.
Failed deliveries are retried for about 9 hours. Use the
idfield or theX-NerdyTags-Event-Idheader to ignore an event you've already received.The headers include
X-NerdyTags-Event,X-NerdyTags-Event-IdandX-NerdyTags-Signature.Send test delivers the same sample you see in Preview data to your URL, so you can set up your Zap or scenario before any real event happens.
When a webhook pauses itself
A webhook pauses itself if:
Your endpoint returns HTTP 410. Zapier sends this when a Zap is turned off.
15 events in a row fail.
To start sending again, fix the problem (for example, turn the Zap back on), then choose Resume from the webhook's actions menu. Check Recent deliveries to see what went wrong and retry deliveries.
Verifying webhook signatures (for developers)
If you're receiving webhooks in your own code, check the X-NerdyTags-Signature header to make sure each request really came from NerdyTags. Apps like Zapier and Make don't need this.
Header format:
t=<unix timestamp>,v1=<signature>Algorithm: HMAC-SHA256, output as lowercase hex.
Signed string:
<timestamp>.<raw request body>. Use the raw body bytes exactly as received. Parsing and re-serializing the JSON won't match.Secret: each webhook has its own secret, starting with
whsec_. It's shown when the webhook is created, and you can view or regenerate it at any time under Signing secret in the webhook's actions menu.Compare in constant time, and reject requests whose timestamp is more than a few minutes old. NerdyTags doesn't enforce a time window itself, so it's up to your code.
Ignore duplicates using the
X-NerdyTags-Event-Idheader, or theidfield in the body. Retries can deliver the same event more than once.
Here's an example in Node.js:
const crypto = require('crypto');
function verify(rawBody, header, secret) {
  const parts = Object.fromEntries(header.split(',').map(p => p.split('=')));
  const expected = crypto.createHmac('sha256', secret)
    .update(`${parts.t}.${rawBody}`)
    .digest('hex');
  const fresh = Math.abs(Date.now() / 1000 - Number(parts.t)) < 300;
  return fresh && crypto.timingSafeEqual(Buffer.from(expected), Buffer.from(parts.v1 || ''));
}