
Everyone who works in your NerdyTags Business organization signs in with their own NerdyTags account and uses one seat. When you invite someone, you choose:
Their organization role, which sets what they can do across the organization and on the profiles they can access directly.
Their direct profile access, which sets which profiles those permissions apply to.
Any groups they should join, with a role for each group. Groups are optional.
People get everything their role, direct access and groups allow. Adding someone to a group never removes access. If they have direct access to all profiles, though, their organization role takes the lead over their group roles. This is explained below.
Invite a team member
Sign in to NerdyTags Business and go to Members. You can also click Invite member on Overview.
Click Invite member.
Enter their Email address.
Choose their Organization role. The roles are described below.
Under Direct profile access, choose All profiles or Specific profiles.
If you like, add them to one or more Groups.
Click Send invite.
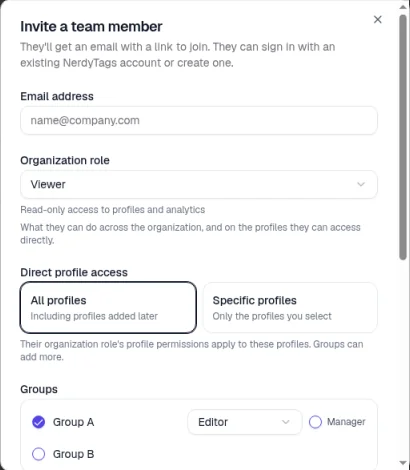
They'll get an email with a link to join. They can sign in with an existing NerdyTags account or create one. Until they accept, their invite holds a seat, so each invite needs a free seat. See Business billing and seats.
Organization roles
The organization role controls what someone can do across the organization, like billing, settings and inviting people, and what they can do on the profiles they can access directly. The invite form shows a short description under the role you pick.
Role | Description |
|---|---|
Admin | Manage members, profiles and settings. |
Editor | Create and edit profiles. This is the default for new invites. |
Viewer | Read-only access to profiles and analytics. |
Member | No organization-wide access. Gets access only through the groups they belong to. |
Each organization also has one Owner, who has full access, including billing and deleting the organization.
For the full list of permissions in each role, and how to make your own roles, see Roles and permissions in NerdyTags Business. Give each person the role with the least access they need.
Direct profile access
All profiles: the person's organization role applies to every profile in the organization, including profiles added later.
Specific profiles: the person's organization role applies only to the profiles you select. Type in Filter profiles to find a profile quickly. This is handy for agents or assistants who look after a few profiles each.
Groups can add more profiles on top of this.
For client profiles, your team can only make the changes the client approved. See Managing client profiles with join codes.
Groups
The Groups section lists your organization's groups. It's optional. They join the groups you pick when they accept the invite.
Tick a group.
Choose their group role for that group: Admin, Editor, Viewer or Member. It starts as Editor.
Tick Manager if they should run the group. Group managers can invite and remove members of the group, add profiles to it, and see its inbox, leads and analytics.
To give someone access only through their groups, click Limit to group access. This sets their organization role to Member and removes the direct profile access choices. The Member role has no profile permissions, so direct access wouldn't give them anything anyway.
Which role takes the lead
Important: if someone's organization role is Admin, Editor or Viewer and their direct profile access is All profiles, their organization role takes precedence over their group roles. To let their group roles take the lead, set their organization role to Member, or choose Specific profiles and don't select any.
For example, someone who's an Editor with no direct profile access, a Viewer in Group A and an Editor in Group B can only view Group A's profiles, and can edit Group B's.
Profiles someone creates belong to the organization, and creating one gives them direct access to that profile.
The form reminds you about this. If you pick groups for someone with a role like Editor or Viewer, it explains that their organization role and direct profile access apply on top of their groups, so group roles won't limit them.
To set up groups, see Organizing your team with groups.
The Members page
Members has two tabs:
Members shows your seats and your team.
Roles shows the built-in and custom roles, with the permissions in each. See Roles and permissions in NerdyTags Business.
Seats
The seats card at the top of the Members tab shows how many of your seats are used. Active members and pending invites both count, and a pending invite holds its seat until it's accepted, revoked or expires.
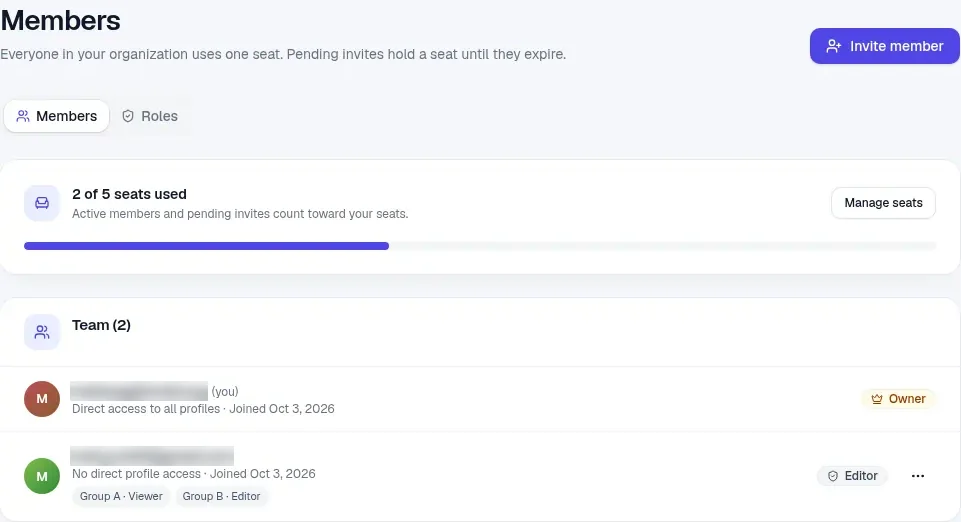
To add or remove seats, click Manage seats. See Business billing and seats.
Your team list
The Team list shows everyone in your organization. Each row shows:
Their email address. Your own row is marked (you).
Their direct profile access, for example Direct access to all profiles, Direct access to 1 profile, No direct profile access or Access through groups only, and when they joined.
How many company profiles they can use in the NerdyTags app, if any, for example 1 profile in the app.
The groups they're in, with their group role, for example "Group A · Viewer".
Their organization role.
Change someone's role or access, or remove them
People with the Change roles, profile access and remove members permission can change a member's organization role, profile access and NerdyTags app access, or remove them from the organization. Owners and Admins have this permission. Other members can see the team list, but not these options.
Click ... next to a member in the Team list. As the Owner, you'll see:
NerdyTags app access, to let them use company profiles in the regular NerdyTags app and mobile app. See Giving team members a company profile in the NerdyTags app.
Edit role and access
Suspend, which changes to Reactivate for a suspended member
Make owner
Remove member
Your own row has a ... menu too.
Edit role and access
Click ... next to the member and choose Edit role and access.
In Edit access, choose their Organization role and their Direct profile access: All profiles, or Specific profiles and select the ones they need. Their current groups are shown too, but group access is managed on the Groups page.
To give them access only through their groups, click Limit to group access.
Click Save changes.
To change someone's role in a group, open the group on Groups. See Organizing your team with groups.
Suspend or reactivate a member
Choose Suspend to suspend a member. A suspended member's menu shows Reactivate, which you can use to make them active again, along with Edit role and access and Remove member.
Remove a member
Click ... next to the member and choose Remove member.
Check the message: they lose access to this organization immediately and their seat is freed.
Click Remove member to confirm.
To review changes to your team, use the Members filter in the audit log.
Related articles
Setting up single sign-on, which can add people from your company automatically