
With single sign-on (SSO), your team signs in to NerdyTags Business through your company's identity provider, such as Okta, Microsoft Entra ID or Google Workspace. You can also add people from your company automatically and require everyone to use SSO.
Setup has three parts: connect your identity provider, verify your email domain, then choose your access options. You'll need someone who can add an app in your identity provider.
Step 1: Connect your identity provider
Go to Settings > Single sign-on. Under Identity provider, the status shows Not connected.
Choose OpenID Connect or SAML 2.0. You can connect one identity provider.
Fill in the details from your identity provider, as described below.
Click Save.
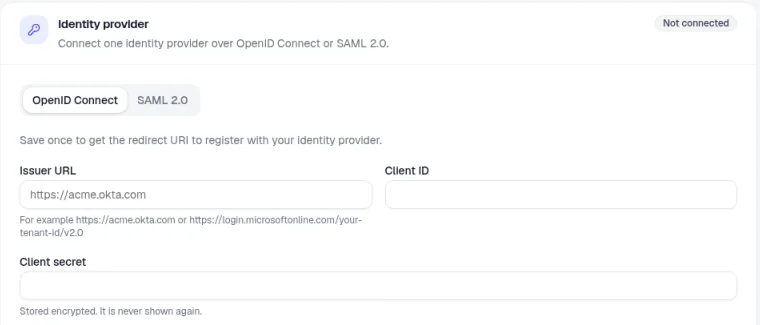
OpenID Connect
Field | What to enter |
|---|---|
Issuer URL | Your identity provider's issuer address, for example https://acme.okta.com or https://login.microsoftonline.com/your-tenant-id/v2.0 |
Client ID | The client ID of the app you created in your identity provider. |
Client secret | The app's client secret. It's stored encrypted and never shown again. |
Email attribute (optional) | The claim that holds the person's email. If you leave it empty, we use email, then preferred_username or upn. |
Save once to get the redirect URI, then add it to the app in your identity provider.
SAML 2.0
Choose how to give NerdyTags Business your identity provider's details:
Option | What to enter |
|---|---|
Metadata URL | The Identity provider metadata URL. We fetch it once when you save. |
Paste XML | The Identity provider metadata XML, copied from your identity provider. |
Enter manually | The Identity provider entity ID, the Sign-in URL (HTTP-Redirect) and the Signing certificate, in PEM or base64 format. |
All three options also have an Email attribute (optional) field. This is the attribute that holds the person's email. If you leave it empty, we use the email-formatted NameID or a standard email attribute.
Save once to get the entity ID, ACS URL and metadata URL, then add them to the app in your identity provider.
When your identity provider rotates its certificate: if you used a metadata URL, save again so we fetch the new details. If you entered the certificate manually, saving a new certificate replaces the current ones.
Setup help for your identity provider
Open Setup help for Okta, Microsoft Entra ID and Google Workspace on the same page for pointers. For SAML 2.0, it suggests:
Okta: create a new SAML 2.0 app integration. Enter our ACS URL as the single sign-on URL and our entity ID as the audience URI, and set the NameID format to EmailAddress. Then copy the app's metadata URL from its Sign On tab into NerdyTags Business.
Microsoft Entra ID: under Enterprise applications, create your own new SAML application. Set its identifier to our entity ID and its reply URL to our ACS URL, then copy the App Federation Metadata URL into NerdyTags Business.
Google Workspace: in the Admin console, add a custom SAML app under Web and mobile apps. Download the identity provider metadata and paste it into NerdyTags Business, then enter our ACS URL and entity ID. Set the Name ID format to EMAIL and the Name ID to the user's primary email.
Once the app is set up in your identity provider, click Test to check the connection, then click Activate. Single sign-on starts working once the connection is activated and at least one email domain is verified.
Step 2: Verify your email domain
Only people with an email address on a verified domain can use single sign-on.
Under Email domains, enter the domain your team uses for email, for example acme.com.
Click Add domain.
Prove you own the domain using one of the two methods below.
Public email domains, like gmail.com, can't be used. Add every email domain your team uses.
Verify with a DNS record
Copy the TXT record shown in the portal. Its name is nerdytags-verify followed by your domain, for example nerdytags-verify.acme.com, and its value starts with nerdytags-verify= followed by a code that's unique to your domain.
Sign in to your DNS provider and add the TXT record exactly as shown.
Back in NerdyTags Business, click Check now.
DNS changes can take a few minutes to appear. If the record isn't found yet, wait a little and click Check now again.
Verify by email
Choose the email method and click Send link. We send a confirmation link to an administrative address on the domain: admin@, administrator@, hostmaster@, postmaster@ or webmaster@.
The person who receives it opens the email and clicks Confirm domain ownership.
The link works for 48 hours. If it expires, send a new one.
Step 3: Choose your access options
The Access switches stay turned off and can't be changed until you have an active identity provider and at least one verified domain.
Add new people automatically: anyone with an email on a verified domain who signs in through your identity provider gets a seat and joins your organization. Each new person uses a seat, so make sure you have enough. See Business billing and seats.
Require single sign-on: members must sign in through your identity provider.
How your team signs in
Once single sign-on is on, your team uses the single sign-on option on the NerdyTags Business sign-in page and signs in with their company account. See Getting started with NerdyTags Business.
If someone can't sign in with single sign-on, check that their email domain is verified, and that your identity provider sends their email address. If it uses a different claim or attribute for the email, enter it in Email attribute.