
NerdyTags has its own analytics built in, but if you already track your website or ads with Google Analytics or a Meta (Facebook) Pixel, you can send your profile visits there too. That way your profile shows up alongside the rest of your traffic, and you can use it for ad audiences. Tracking pixels are available on every plan.
Before you start
You'll need the ID from the service you want to use:
Google Analytics: your measurement ID. In Google Analytics, you'll find it under the settings for your web data stream. It starts with G- for Google Analytics 4. Older Universal Analytics IDs start with UA-.
Meta Pixel: your Pixel ID, a long number. You'll find it in Meta Events Manager.
Add your IDs
In your dashboard, go to Settings > Integrations.
Check the line at the top of the page, for example "These settings apply to your @yourname profile". Tracking pixels are set for one profile at a time, so switch profiles first from the account menu in the sidebar if you need to.
Under Tracking pixels, enter your ID in Google Analytics measurement ID, Meta (Facebook) Pixel ID, or both. The fields save automatically. There is no Save button.
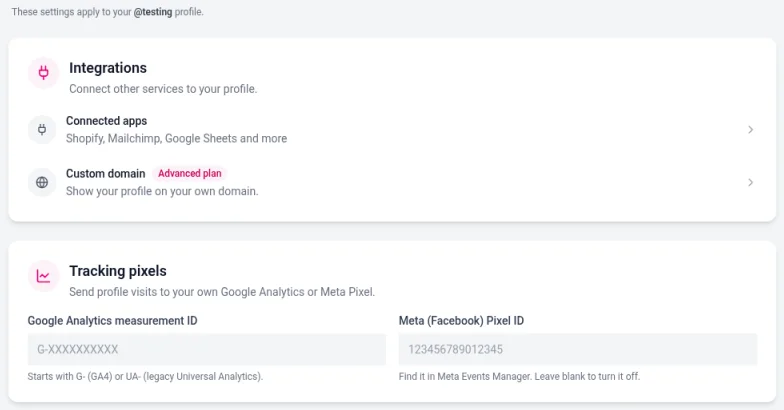
To check it's working, open your profile in a new browser window, then look for the visit in the real-time report in Google Analytics, or use the Test events tool in Meta Events Manager. New visits can take a few minutes to show up.
Turn tracking off
To stop sending visits to a service, clear its field and leave it blank.
Good to know
Your NerdyTags analytics keep working whether or not you add a tracking pixel. See Understanding your analytics.
If you manage several profiles, add the IDs to each profile you want to track. You can use the same ID on more than one profile.
If you add a Meta Pixel or Google Analytics to your profile, check that your own privacy policy covers it.