
Add a Post to chat action to an automation and NerdyTags posts a message to your Discord channel whenever a new lead comes in. Your team sees each new subscriber or form submission right where they're already talking, with a link to open the lead in NerdyTags.
You'll set this up in NerdyTags Business under Automations. You'll also need a Discord server where you have the Manage Webhooks permission. Server owners and admins have it by default.
Discord is added as an action, not an integration, so it doesn't count toward the 5 integrations each automation can have. To learn about the other actions, like notifying members or tagging the lead, see Automation actions: notify, email, tag and post to chat.
Step 1: Add a Post to chat action
In the sidebar, go to Automations, then create a new automation or open an existing one.
In the list of actions, click Post to Slack, Teams or Discord.
A Post to chat action is added. Choose Discord.
The action buttons sit below any actions you've already added, just above Send to apps:

Once you choose Discord, the action shows three short steps for getting a webhook URL, a How to get a Discord webhook URL link, and a Discord webhook URL field.
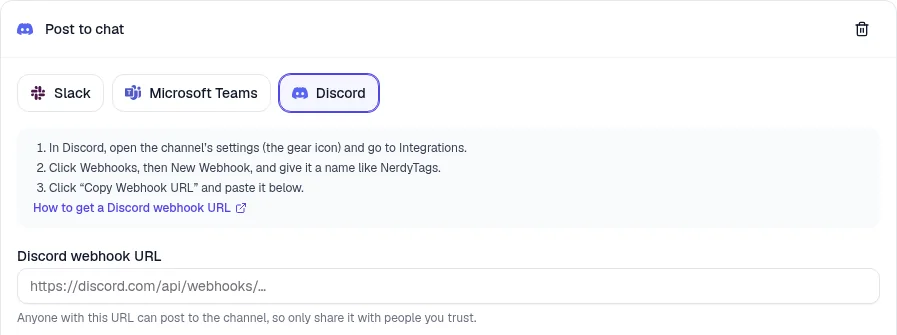
Keep this tab open while you create the webhook in Discord.
Step 2: Create a webhook in Discord
A webhook gives NerdyTags a way to post to one channel in your server.
In Discord, hover over the channel you want leads posted to and click the gear icon (Edit Channel).
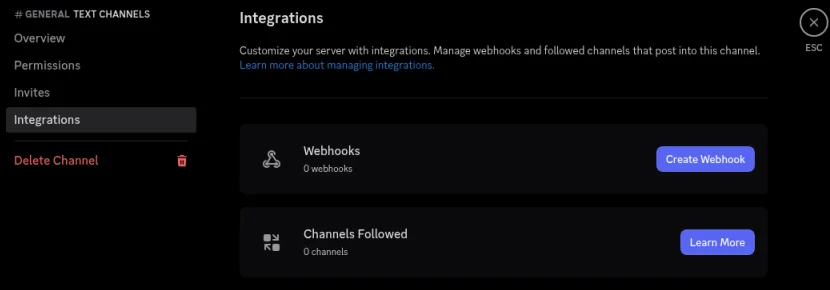
Go to Integrations.
Click Create Webhook. If the channel already has webhooks, click Webhooks, then New Webhook.
Discord gives the new webhook a name like "Captain Hook". Change the Name to NerdyTags so your team knows where the posts come from, and check that Channel is the one you want.
Click Copy Webhook URL.
Here's the channel's Integrations page, with Create Webhook next to Webhooks:
And the webhook once it's renamed, with the Copy Webhook URL button:
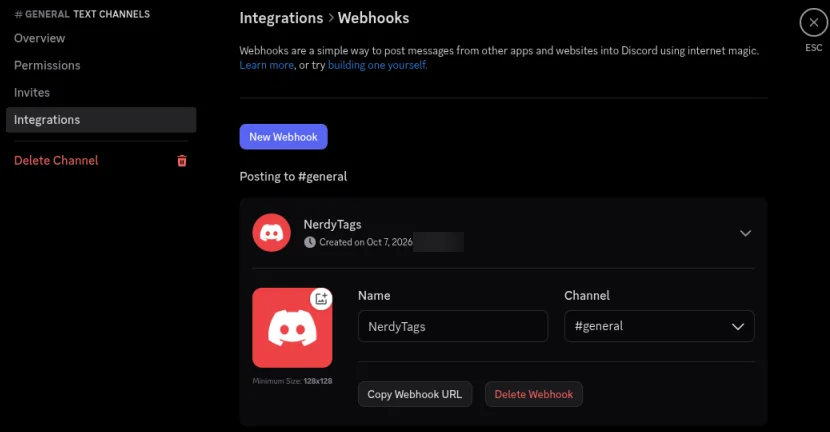
The URL starts with https://discord.com/api/webhooks/.... Anyone with this URL can post to the channel, so only share it with people you trust.
Don't see Integrations in the channel settings? You'll need the Manage Webhooks permission. Ask a server owner or admin to give it to you, or to create the webhook for you.
Step 3: Paste the URL and save
Back in NerdyTags, paste the URL into the Discord webhook URL field.
Choose whether to keep Include form answers on. It's on by default, so posts include every answer from your form. Turn it off to post only the name, email and a link to the lead, keeping other answers out of the channel.
Click Save changes on the automation.
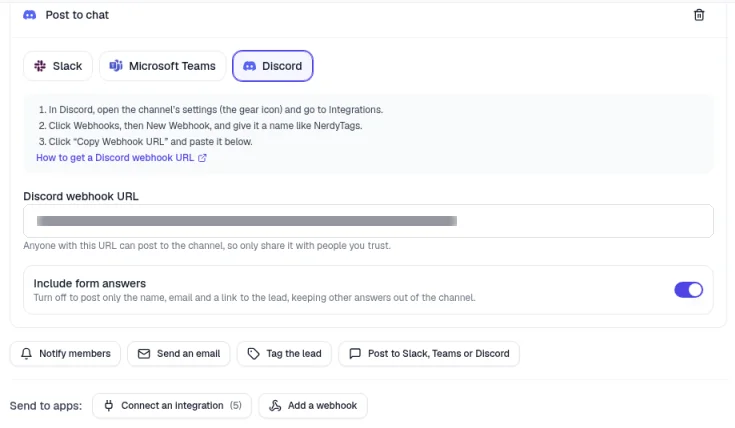
Send a test post
At the bottom of the automation, Run test shows what would happen for a sample lead. Pick a trigger and a profile, then click Run test.
Emails and apps aren't sent in a test, but the Discord action posts a sample message to your channel, so it's an easy way to check the webhook works. The sample uses example details, like the email [email protected] and the name Jane Doe. Test runs don't appear in Recent runs.
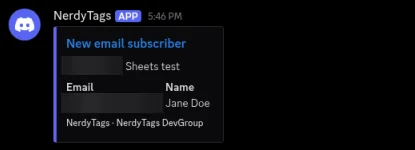
What the posts look like
Each post comes from the NerdyTags webhook and has:
A title that links to your organization's Leads page in NerdyTags Business.
The profile and automation: the name of the profile the lead came from, then the automation's name (like Sheets test).
The lead's details, which depend on the trigger.
A footer with "NerdyTags" and your organization's name.
For a new subscriber, the title is New email subscriber, followed by their Email and Name.
For a form submission, the title includes the form's name, like New "Contact Me" submission. The post lists the Form, the person's Email and their answers, such as Reason and Message:
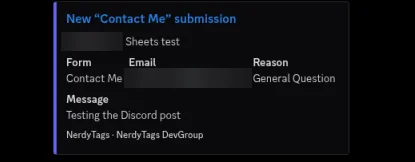
If you turned off Include form answers, form posts show just the person's name, email and the link to the lead.
When posts are sent
NerdyTags posts to Discord every time the automation runs on its trigger. Depending on how the automation is set up, that's each new subscriber, each form submission, or both.
Stop posting to Discord
You can stop the posts in either app:
In NerdyTags: open the automation, click the trash icon on the Post to chat action, then click Save changes.
In Discord: open the channel's Integrations settings, go to Webhooks, open the NerdyTags webhook and click Delete Webhook. NerdyTags can't post to the channel after that, so remember to remove the action from the automation too, or paste in a new webhook URL.
Messages already posted stay in the channel.