
Every link on the Links page of your dashboard has a row of icons along the bottom of its card. Each icon opens a panel with extra options for that link. Changes save automatically, and you'll see Link updated successfully when they do.
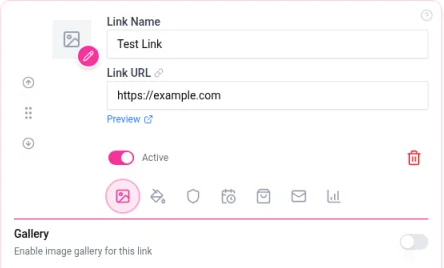
From left to right, the icons are:
Icon | What it does | Plan |
|---|---|---|
Gallery | Shows a gallery of images on the link | All plans |
Style | Changes how the link button looks | All plans |
Protection | Adds an age check, a subscribe step or a passcode | Age check and subscribe step on all plans, passcode on Pro and Business |
Schedule | Shows and hides the link on dates you choose, with an optional countdown | Pro and Business |
Shopify | Connects the link to your Shopify store | Business |
Contact form | Turns the link into a contact form popup | All plans |
Analytics | Opens stats for just this link | All plans |
Paid features work on profiles you've turned on as premium pages. See What are premium pages?
Style
The Style panel changes how a single link looks on your profile. Choose a layout:
Button: a standard button. This is the default.
Featured, Thumbnail and Tile: larger layouts that show an image. These become available once the link has an icon (the link image) or a background image.
You can also:
Turn on Hide Icon or Hide Name.
Set the Label Position (Center by default).
Turn on Text Wrap so long link names wrap onto a second line.
Add a Background Image. Click Click to upload background image and choose a picture. It's cropped to a wide 5:1 shape.
Change the Button Height.
To change the look of all your buttons at once, use Customize > Buttons instead. See How to customize your profile theme.
Gallery
A gallery shows a set of images on the link.
Click the Gallery icon (the picture icon) and turn on Enable image gallery for this link.
Under Image Gallery, upload your images. You can select several at once.
A gallery holds up to 6 images on Free and Pro, and up to 9 on Business.
Protection
The Protection panel has three options:
Age-Restricted Content (all plans): visitors must confirm their age before opening the link.
Subscription Protection (all plans): visitors must subscribe to your email list before the link opens.
Passcode Protection (Pro and Business): visitors must enter a 5-digit passcode. Type your own or click Generate, then click Save. Share the passcode with the people you want to let in.
Schedule and countdowns (Pro and Business)
Use Schedule Link to set when a link should appear and disappear, for example for a limited sale or a ticket drop. You can also show a countdown to build excitement.
Click the Schedule icon (the calendar) and turn on Schedule Link.
Under Start Date & Time, leave Start now on, or turn it off and pick a date and time.
Under End Date & Time, leave Never end on, or turn it off and pick when the link should disappear.
Check the Timezone. By default, the end time uses the same time zone as the start date.
To show a countdown on your profile, turn on Show Countdown Timer. Turn on Add Custom Message to show your own text with it.
Click Save Schedule.
Shopify (Business)
The Shopify panel connects the link to your Shopify store. If you haven't connected a store yet, you'll see No Shopify Store Connected. Click Go to Integrations to Connect Shopify to set it up, then come back to the link. See Connecting Mailchimp, Google Sheets, Shopify and other integrations.
Contact form
A contact form opens as a popup when visitors tap the link, so people can get in touch without seeing your email address.
Click the Contact form icon (the envelope) and turn on Turn this link into a contact form popup.
Fill in the Form Title, an optional Form Description, the Submit Button Text and the Success Message visitors see after sending.
Enter the Notification Email where submissions should be sent.
Set up the form fields. Email is always included and required. For each extra field, add a Field Label and an optional Placeholder.
Click Save Form Settings.
New submissions appear on your Notifications page and are emailed to the notification email. To get a push alert as well, turn on Form submissions in your notification settings. See Managing your notifications.
Analytics
Click the Analytics icon (the bar chart) to open the Analytics page filtered to that link. You'll see Showing analytics for: followed by the link name. Click the x to go back to stats for your whole profile. See Understanding your analytics.